LEGO Blog
All the latest Brixbox news, straight from the team.
A Collector’s Guide to LEGO Helmet Presentation
A LEGO helmet is not a background build. From the severe silhouette of Darth Vader to the weathered look of Boba Fett, these compact display pieces carry an enormous amount of character. A considered guide to LEGO helmet presentation helps you move beyond simply finding a spare shelf and create a display that gives every helmet the presence it deserves.
The good news is that helmet presentation does not require a dedicated collector’s room. It is about controlling a few details: the height of the build, the visual space around it, the light falling across it and the protection keeping dust away from all those carefully placed pieces. Get those right and even a single helmet can feel like a centrepiece.
Start with the helmet’s personality
LEGO helmets are designed around recognisable shapes, and that shape should lead the presentation. A Stormtrooper helmet has a crisp, symmetrical look that suits a clean, minimalist backdrop. The Scout Trooper and Boba Fett helmets have more texture and visual detail, so they benefit from a setting that lets you appreciate their layered construction. Iron Man’s angular gold-and-red design can carry a more dramatic, high-contrast presentation.
This is why a long, crowded bookcase rarely brings out the best in a helmet collection. When helmets are squeezed between novels, houseplants and assorted models, their silhouettes disappear. Give each build enough breathing room to be read at a glance, particularly from the doorway or the other side of the room.
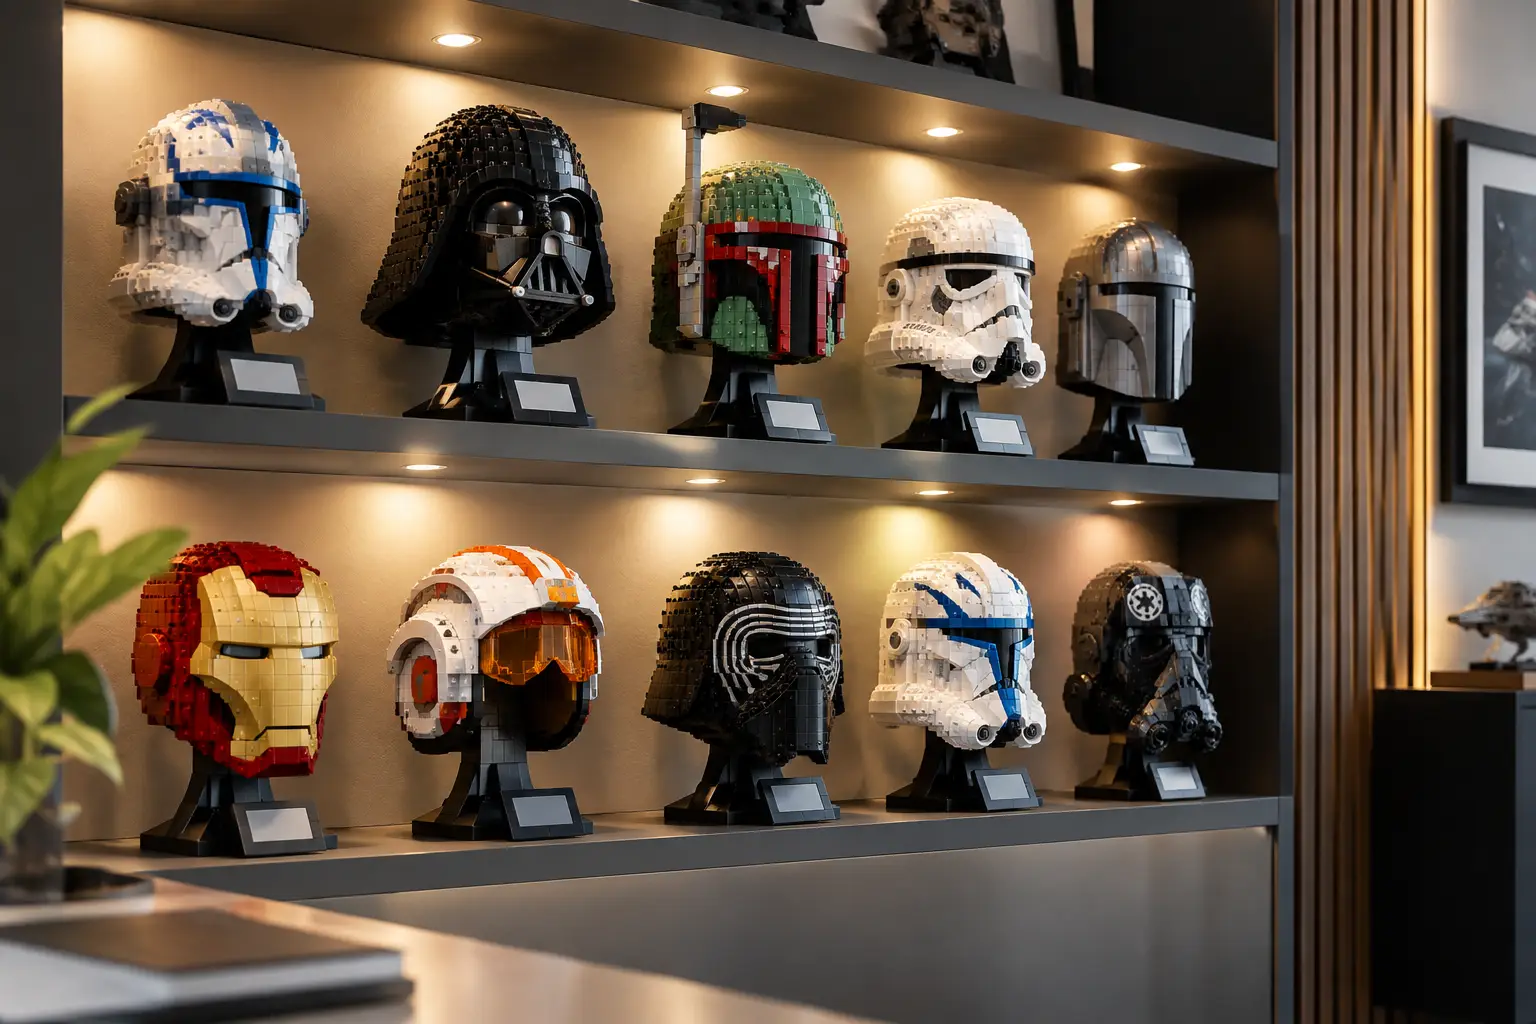
If you own one helmet, present it as a statement piece. If you own several, decide whether you are building a unified line-up or a collection of individual showcases. Both approaches work, but they create very different results. A uniform row feels like a gallery display; individual cases let each character have its own moment.
Choose the right shelf height and viewing angle
Helmets look their best when viewed close to eye level. This puts the printed elements, vents, curves and brick-built contours where they can be appreciated without constantly looking down on the model. A high shelf can work for a larger collection, but avoid placing your favourite helmet so high that all you see is the top.
A display between chest and eye height is usually the sweet spot. It feels intentional, keeps the base visible and makes the helmet easy to inspect. If you are placing one on a desk, sideboard or media unit, raise it slightly with a purpose-made display base rather than leaving it visually lost among everyday objects.
Consider the direction of the room too. A helmet facing straight forward has maximum impact, especially in a row. Turning a build a few degrees can reveal clever side construction, but too much angle can make a multi-helmet display feel untidy. Consistency matters more than chasing the perfect pose for every model.
Keep the base working for the build
The standard LEGO helmet stand gives the model its identity, complete with nameplate, but a plain shelf can make it look isolated. A printed base adds definition beneath the build and helps establish a visual boundary. It also gives you the opportunity to echo the source material: Imperial grey for a Trooper, a deep galactic scene for a Star Wars icon, or a clean industrial design for a Marvel helmet.
The best base designs support the build rather than competing with it. Highly detailed artwork can be brilliant behind a darker helmet, but it may distract from a busier model with varied colours. Think of the base as the frame around a favourite poster. It should make the subject feel more complete, not demand equal attention.
Build a better backdrop
The wall or surface behind a LEGO helmet has a surprising effect on how sharp it appears. Dark helmets can disappear against black shelving, while bright white builds can lose their outline against a pale wall. Contrast is your ally.
A white Stormtrooper helmet gains definition against charcoal, navy or a themed printed background. Darth Vader often looks striking against a lighter grey backdrop that catches the contours of the dome. For colourful designs such as Iron Man, a dark, restrained setting lets the red and gold do the work.
You do not have to redecorate a room to achieve this. A themed back panel, a clean section of wall or a carefully chosen cabinet interior can create enough separation. Just avoid backgrounds with dense patterns, unless they are designed specifically to frame the build. The helmet should always be the first thing your eye lands on.
For collectors creating a Star Wars shelf, a consistent background treatment can make models from different releases feel like one curated collection. This is especially effective when mixing helmets, ships and character displays, as it prevents the shelf becoming a patchwork of unrelated builds.
Light the display, not the dust
Direct sunlight is one of the least collector-friendly forms of lighting. It can create harsh glare on acrylic, wash out details and expose models to unnecessary UV over time. Position helmet displays away from prolonged direct sun where possible, particularly if the collection includes printed pieces or lighter colours you want to keep looking their best.
Soft ambient room light is a dependable starting point. A warm-white LED strip above or beneath a shelf can add depth, while a small directional lamp can highlight a single centrepiece. The aim is not to flood the helmet with brightness. You want enough light to show the shaping around the cheeks, visor and crown without casting a heavy shadow across the front.
Lighting has trade-offs. Strong LEDs make a display feel more dramatic, but can reveal every speck of dust and create reflections in a case. Gentler lighting gives a more relaxed look and is easier to live with, but may soften the impact of darker builds. Test the display at the time you are most likely to enjoy it, whether that is during an evening film session or in daylight beside your desk.
Protect the finished build properly
A helmet build has dozens of small ledges where dust settles. Over time, that soft grey coating dulls black elements, gathers in studs and turns a proud display into another cleaning job. Regular dusting is possible, but it means handling the model more often and risks knocking off delicate details.
A fitted acrylic case is the cleaner answer for display-conscious collectors. It protects the helmet from dust, curious hands and accidental knocks while keeping the model visible from every angle. For premium builds, it also creates a clear sense that the model is part of a collection, not simply something left on a shelf.
Set-specific cases are worth considering because fit affects the finished look. A case that is too large can make a helmet seem undersized, while one that is too tight leaves little visual space around the model and can make access awkward. The ideal proportions give the build room to stand proud while remaining compact enough for a neat shelf arrangement.
At Brixbox, display cases with optional printed bases and UV-printed backgrounds are made for exactly this kind of presentation: preserving the build while giving it a setting worthy of the character behind it.
Give every case room to breathe
Even the finest case loses impact when pushed hard against another. Leave a small, deliberate gap between displays so the edges remain visible and the collection does not become one long block of acrylic. This is particularly useful with a growing helmet line, where each new release should feel like an addition to the gallery rather than another object competing for space.
For a shelf of three or more helmets, matching case heights and aligned front edges create immediate order. If your helmets vary in size, align their bases rather than their tops. The shelf will look grounded, and the differences in shape will feel intentional.
Create a collection with a story
The strongest helmet displays have a point of view. You might collect the dark side, build a line-up of bounty hunters, focus on Clone Troopers, or pair Star Wars helmets with the vehicles and scenes that made you love them. A story gives you a useful filter when space is limited and makes a display more satisfying than a simple release-date line-up.
There is no rule saying every helmet needs identical treatment. A complete uniform display is brilliant for collectors who love symmetry. Yet a rare favourite, a gifted build or the helmet that started the collection may deserve its own larger case, printed scene or dedicated light. Let the collection be orderly, but leave space for personality.
A well-presented LEGO helmet earns a second life after the final brick clicks into place. Keep it clean, give it contrast, and make room for the silhouette to speak. Whether it stands alone on a desk or leads a full shelf of legends, the right presentation turns a finished build into something you will want to look at every day.
RECENT POST